martes, 6 de diciembre de 2011

Message queue in Exchange 2007 (Author: Nathan Winters )

  • Author: Nathan Winters (Excellent information)

Brief

This article investigates message queues in Exchange 2007. I begin by highlighting the differences in architecture between Exchange 2003 and 2007 in particular, discussing the fact that Exchange 2007 uses a queue database. I then discuss the new look queue viewer in Exchange 2007 and what it actually does! Finally I take a look at how the queue viewer is built on PowerShell and suggest some ways in which that could be useful!


Queue Theory

So where does this database fit in? Well as mentioned briefly above, all queue activity now occurs in a new ESE database. The main database file is called mail.que and by default can be found here:

C:\Program Files\Microsoft\Exchange Server\TransportRoles\data\Queue


Figure 6: Folder containing queue database files

The other files are in the locations as described below:

  • Trn.chk - The checkpoint file.
  • Trn.log - The current transaction log file.
  • Trntmp.log - The next provisioned transaction log file that is created in advance.
  • Trnnnn.log - Other transaction log files that are created when Trn.log reaches its maximum size.
  • Trnres00001.jrs - The Reserve log file.
  • Trnres00002.jrs - The Second Reserve log file.
  • Temp.edb – Temp DB used to verify database schema on start-up.

You might wonder what happens with the logs in this scenario. Well, they are configured for circular logging with transaction logs being deleted after they have been committed.

Just before we move on to another area, it is worth stating how to move the queue databases. One important reason for moving the Queue DB and logs is performance. Another slightly less well known reason is that the drive on which the Queue DB and logs are stored must have 4GB or more free space otherwise the server will apply back pressure and start slowing the flow of messages!

When moving the DB, the usual rules for splitting transaction logs and DB files apply. To move the databases you must edit the EdgeTransport.exe.config file which by default is located at the location below and then stop and restart the msexchangetransport service:

C:\Program Files\Microsoft\Exchange Server\Bin\EdgeTransport.exe.config

The key thing to bear in mind before editing the config file is that the parent directory has the correct permissions as set up below; that way the directory will be created for you:

  • Network Service: Full Control
  • System: Full Control
  • Administrators: Full Control

The relevant lines are shown below. To move the database, you should edit the line containing “QueueDatabasePath” and to move the logs, you should edit the line containing “QueueDatabaseLoggingPath”. You can see in Figure 7 that I have moved my DB and logs to H:


Figure 7:
Editing the EdgeTransport.exe.config file (click to view a larger image)

Having looked at the Database it is now time to understand what it contains. There are various different queues:

  • Submissions: Used by the categorizer to gather all messages that have to be resolved, routed, and processed by Transport agents.
  • Poison Message: The poison message queue is a special queue that is used to isolate messages that are detected to be potentially harmful to the Exchange 2007 system after a server failure.
  • Remote Delivery: Remote delivery queues hold messages that are being delivered to a remote server by using SMTP.
  • Mailbox Delivery: The mailbox delivery queues hold messages that are being delivered to a mailbox server by using encrypted Exchange RPC.
  • Unreachable Destination: Each transport server can have only one Unreachable queue. The Unreachable queue contains messages that cannot be routed to their destinations.


http://www.msexchange.org/articles_tutorials/exchange-server-2007/management-administration/exchange-2007-message-queues.html

lunes, 5 de diciembre de 2011

Posters

http://www.microsoft.com/download/en/details.aspx?displaylang=en&id=17881

http://www.microsoft.com/download/en/confirmation.aspx?id=7002

http://www.microsoft.com/download/en/confirmation.aspx?id=3501

http://social.technet.microsoft.com/wiki/contents/articles/749.aspx

http://blogs.technet.com/b/schadinio/archive/2010/08/18/microsoft-technet-posters.aspx

http://blogs.msdn.com/b/cbowen/archive/2007/12/09/got-tech-posters.aspx

domingo, 4 de diciembre de 2011

Get-RpcClientAccess

Use the Get-RpcClientAccess cmdlet to display the settings for the Exchange RPC Client Access service that's running on the Client Access server role on Microsoft Exchange Server 2010.

By default CAS role is enable an responsible for mailboxes services, and Mailbox server role is responsible for Public folders.


By default Outlook 2007/10 is enable for encrypted all communication between client / server but for outlook 2003 no, we must to disable the encryption from server side or just enable it on the clients:


http://technet.microsoft.com/en-us/library/dd335190.aspx

martes, 22 de noviembre de 2011

Understanding Move Requests

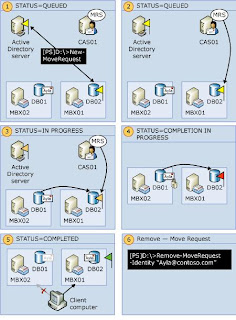
When you use the move request cmdlets to move mailboxes, MRS processes the move process. As stated earlier, MRS resides on an Exchange 2010 Client Access server and is the service that moves mailboxes from the source database to the target database. In Exchange 2007, the mailbox move is performed by the Move-Mailbox cmdlet. By using a service as the agent of the move, mailboxes can be moved while simultaneously remaining accessible to users. During the move, you can view, cancel, and manage the move request from any Exchange 2010 server in your organization.


The following describes a remote mailbox move scenario:

  • One forest is an Exchange 2010 forest and the other forest has at least one Exchange 2010 Client Access server.
  • MRS and MRSProxy exist on all Exchange 2010 Client Access servers. MRS processes the cross-forest moves.
  • The Fourth Coffee and Contoso forests both contain Exchange 2010 Client Access servers, but only Contoso contains Exchange 2010 Mailbox servers. Fourth Coffee contains only Exchange 2007 SP2 Mailbox servers.
  • Fourth Coffee contains the mailbox for tony@fourthcoffee.com. Contoso contains a mail-enabled user for tony@fourthcoffee.com that has all the prerequisite settings configured.
  • The following command is run from the target forest, Contoso.com.
    New-MoveRequest -Identity 'tony@fourthcoffee.com' -TargetDatabase DBa  -RemoteHo
    stName 'CAS01.fourthcofee.com' -RemoteCredential (Get-Credential Atlanta\Admini
    strator) -TargetDeliveryDomain 'mail.contoso.com'


When mailboxes are moved from an Exchange 2010 SP1 database to any other database, Exchange doesn't fully delete the mailbox from the source database immediately upon completion of the move. Instead, the mailbox in the source mailbox database is switched to a soft-deleted state. Mailbox data can be accessed during a mailbox restore operation using the MailboxRestoreRequest cmdlet set. The soft-deleted mailboxes are retained in the source database until either the deleted mailbox retention period expires or you use the Remove-StoreMailbox cmdlet to purge the mailbox.

http://technet.microsoft.com/en-us/library/dd298174.aspx


sábado, 10 de septiembre de 2011

G2-G5 cert problems, Verising again!!!

One year ago Verising Corporation changed those intermediate certificates, those certificates are use for ours internet browsers, mobile devise and all encrypted communications to build the secure connection with client-server authentication (certificate and entities certificate authority to build the chain authentication method).


The fist problem was with G5 cert:

http://treadstoneso.blogspot.com/2011/05/connection-broken-between-isa-fw-and.html

VeriSign Class 3 Public Primary Certification Authority - G5 (serial number)

1b 09 3b 78 60 96 da 37 bb a4 51 94 46 c8 96 78 --- wrong cert

18 da d1 9e 26 7d e8 bb 4a 21 58 cd cc 6b 3b 4a--- wrong cert

‎25 0c e8 e0 30 61 2e 9f 2b 89 f7 05 4d 7c f8 fd --- correct cert

Now there is a problema with G2 certificate:

Problem

VeriSign G2 root not installed in Windows Mobile 5 and Mobile 6 causing trust and synchronization issues.

Windows Mobile

Cause

Verisign G2 root not installed on devices using Windows Mobile 5 and Mobile 6.

Resolution

NOTE: This solution can be used for Secure Site certificates issued via Retail Channels and for Standard certificates issued via Managed PKI for SSL accounts.

Remove all copies of the original VeriSign Class 3 Secure Server CA-G2 intermediate certificate from the server and replace with the Alternate VeriSign Class 3 Secure Sever CA-G2 intermediate. Create a Certificate Snap-in in the Microsoft Management Console (MMC) and remove the original VeriSign Class 3 Secure Server CA-G2 and import the Alternate VeriSign Class 3 Secure Sever CA-G2 in the Intermediate Certification Authorities > Certificate store in MMC. Solution
SO6127 provides instructions on using the MMC.


The original VeriSign Class 3 Secure Server CA-G2 has the following properties:

Issued to: VeriSign Class 3 Secure Server CA-G2

Issued by: VeriSign Trust Network

Serial Number: 6e 4f fa b3 c5 e6 69 c4 d1 67 c9 92 ab e8 58 c4 – wrong

The Alternate VeriSign Class 3 Secure Server CA-G2 has the following properties:

Issued to: VeriSign Class 3 Secure Server CA-G2

Issued by: Class 3 Public Primary Certification Authority

Serial Number: 1b 3a 7b f0 d1 d1 6e 32 3d fe 08 8e e5 cf cc 7c --- correct


https://knowledge.verisign.com/support/ssl-certificates-support/index?page=content&id=SO13347&actp=search&viewlocale=en_US


jueves, 4 de agosto de 2011

Understanding Management Role Groups

A management role group is a universal security group (USG) used in the Role Based Access Control (RBAC) permissions model in Microsoft Exchange Server 2010. A management role group simplifies the assignment of management roles to a group of users. All members of a role group are assigned the same set of roles. Role groups are assigned administrator and specialist roles that define major administrative tasks in Exchange 2010 such as organization management, recipient management, and other tasks. Role groups enable you to more easily assign a broader set of permissions to a group of administrators or specialist users.


  • Role holder A role holder is a mailbox that can be added as a member of a role group. When a mailbox is added as a member of a role group, the assignments that have been made between management roles and a role group are applied to the mailbox. This grants the mailbox all of the permissions provided by the management roles.
  • Management role group The management role group is a special USG that contains mailboxes that are members of the role group. This is where you add and remove members, and it's also what management roles are assigned to. The combination of all the roles on a role group defines everything that users added to a role group can manage in the Exchange organization.
  • Management role assignment A management role assignment links a management role and a role group. Assigning a management role to a role group grants members of the role group the ability to use the cmdlets and parameters defined in the management role. Role assignments can use management scopes to control where the assignment can be used. For more information, see Understanding Management Role Assignments.
  • Management role scope A management role scope is the scope of influence or impact on a role assignment. When a role is assigned with a scope to a role group, the management scope targets specifically what objects that assignment is allowed to manage. The assignment, and its scope, are then given to the members of the role group, which restricts what those members can manage. A scope can be made up of lists of servers or databases, organizational units, or filters on server, database or recipient objects. For more information, see Understanding Management Role Scopes.
  • Management role A management role is a container for a grouping of management role entries. Roles are used to define the specific tasks that can be performed by the members of a role group assigned the role. For more information, see Understanding Management Roles.
  • Management role entries Management role entries are the individual entries on a management role that provide access to cmdlets, scripts, and other special permissions that enable access to perform a specific task. Most often, role entries consist of a single cmdlet and the parameters that can be accessed by the management role, and therefore the role group to which the role is assigned.


  • When you create a role group, you create the USG that holds the members of the role group, and you create the assignments between the role group and the management roles you specify. Optionally, you can also specify a management scope to apply to the role assignments, and you can add any mailboxes that you want to be members of the new role group.

    After you create a role group, each layer becomes an independent object. The role group continues to be the central point at which all of the layers are joined together, however, each layer is managed individually. For example, to modify the management scope that you applied to the role group when it was created, you need to change the scope on each individual role assignment after the role group is created. The management of the role group model is performed using the cmdlets that manage the individual layers of the role group model.

    The following table lists the role group layer and the procedural topics that you can use to manage each layer.

    Role group management topics

    Role group model layer Management topic

    Role holder

    Add Members to a Role Group

    Remove Members from a Role Group

    Role group

    Create a Role Group

    Change a Linked Foreign USG on a Linked Role Group

    Add or Remove a Role Group Delegate

    Remove a Role Group

    Management roles and assignments

    Add a Role to a Role Group

    Remove a Role from a Role Group

    Change the Scope of Role Assignments to a Role Group

    Management role entries

    Add a Role Entry to a Role

    Change a Role Entry

    Remove a Role Entry from a Role

    Dd638105.note(en-us,EXCHG.141).gifNote:
    Changing the management role entries in management roles in a role group is an advanced task and is generally not required in most cases. You may, instead, be able to use a preexisting management role that suits your requirements. For more information, see Built-in Role Groups.

    Return to top

    Built-in roles groups are roles shipped with Exchange 2010. They provide you with a set of role groups that you can use to provide varying levels of administrative permissions to groups of users. You can add or remove users to or from any built-in role group. You can also add or remove role assignments to or from most role groups. The only exceptions are the following:

    • You can't remove any delegating role assignments from the Organization Management role group.
    • You can't remove the Role Management role from the Organization Management role group.

    The following table lists all of the built-in role groups included with Exchange 2010. For more information about built-in role groups, see Built-in Role Groups.

    Built-in role groups

    Role group Description

    Organization Management

    Administrators who are members of the Organization Management role group have administrative access to the entire Exchange 2010 organization and can perform almost any task against any Exchange 2010 object.

    View-Only Organization Management

    Administrators who are members of the View Only Organization Management role group can view the properties of any object in the Exchange organization.

    Recipient Management

    Administrators who are members of the Recipient Management role group have administrative access to create or modify Exchange 2010 recipients within the Exchange 2010 organization.

    UM Management

    Administrators who are members of the UM Management role group can manage the Unified Messaging (UM) features in the Exchange organization such as Unified Messaging server configuration, UM properties on mailboxes, UM prompts, and UM auto attendant configuration.

    Discovery Management

    Administrators or users who are members of the Discovery Management role group can perform searches of mailboxes in the Exchange organization for data that meets specific criteria.

    Records Management

    Users who are members of the Records Management role group can configure compliance features, such as retention policy tags, message classifications, transport rules, and more.

    Server Management

    Administrators who are members of the Server Management role group have administrative access to Exchange 2010 server configuration. They don't have access to administer Exchange 2010 recipient configuration.

    Help Desk

    Users who are members of the Help Desk role group can perform limited recipient management of Exchange 2010 recipients.

    Hygiene Management

    Administrators who are members of the Hygiene Management role group can configure the antivirus and anti-spam features of Exchange 2010. Third-party programs that integrate with Exchange 2010 can add service accounts to this role group to grant those programs access to the cmdlets required to retrieve and configure the Exchange configuration.

    Public Folder Management

    Administrators who are members of the Public Folder Management role group can manage public folders and databases on Exchange 2010 servers.

    Delegated Setup

    Administrators who are members of the Delegated Setup role group can deploy previously provisioned Exchange 2010 servers.

    martes, 19 de julio de 2011

    Optimizing Storage for Exchange Server 2003

    Disk subsystem bottlenecks cause more performance problems than server-side CPU or RAM deficiencies, and a poorly designed disk subsystem can leave your organization vulnerable to hardware malfunctions. Specifically, your disk subsystem is performing poorly if it is experiencing:
    • Average read and write latencies over 20 ms.
    • Latency spikes over 50 ms that last for more than a few seconds.
    Diskpart:

    Español:
    Esta tool de MS nos permite alinear las pista de los discos a las piastas de los sectores organizando de forma mas eficiente cada pista del disco y la infoamcion en el.
    Windows 2000/2003 lee blques de disco en 4kb.

    English:
    the default starting sector for disks that have more than 63 sectors per track is the 64th sector. Because Windows will read blocks of 4 KB (8 sectors), one out of every eight blocks of data written to your disk will span two disk tracks (assuming 64 sectors per track). DiskPar can increase disk performance as much as 20 percent.


    Ejemplo (EG):

    1 sector---------512bt

    windows lee o guarda (I/O) bloques de 4kb (8 sectores)(512*8=4KB)

    |--|--|--|--|--|--|--|--| 1er bloke de 4k

    |--|--|--|--|--|--|--|--| 2do bloke de 4k

    |--|--|--|--|--|--|--|--| 3er bloke de 4k

    |--|--|--|--|--|--|--|--|

    |--|--|--|--|--|--|--|--|

    |--|--|--|--|--|--|--|--|

    |--|--|--|--|--|--|--|--|

    |--|--|--|--|--|--|--|00| 8° bloke de 4k (00 es un sector no disponible usado por el MBR)

    Total = 1 pista de 64sectores (8 sectotes (4kb) cada 8 blokes = 64 sectores)

    Con disk part ustilizamos este sector optimizando en un 20% el disco.

    Antes de diskpart (before diskpart):


    Despues de diskpart (after diskpart):


    Formatear el disco en blokes de 4kb.

    Mas info:
    http://www.msexchange.org/tutorials/disk-geometry.html

    For example, if you have a computer running Exchange 2003 that contains one storage group with five databases, you should configure the following separate, physical RAID arrays:

    • C:\ - System volume, operating system, Exchange system files - RAID-1 (direct-attached storage, not SAN)
    • D:\ - Page file - RAID-1 (direct-attached storage, not SAN)
    • E:\ - SMTP and MTA queues - RAID-1+0 (SAN)
    • F:\ - Log files from storage group 1 - RAID-1 (SAN)
    • G:\ - Databases from storage group 1 - RAID-1+0 (SAN)
    http://technet.microsoft.com/en-us/library/bb125079%28EXCHG.65%29.aspx


    Como ver la configuracion actual de un disco:

    fsutil fsinfo ntfsinfo :


    Diferencias con exchange 2007:

    Exch07 al ser una arquitectura x64, windows administra en una forma muy distinta la utilizacion de memoria y el use de disco, formatear los discos de base en blokes de 64k es un factor de mejora en la performance en este caso.


    http://technet.microsoft.com/en-us/library/bb124518%28EXCHG.80%29.aspx


    More Information:
    • Suppress Tuning and Use Thread Count : Automatic tuning works effectively only when you choose to host individual database and log paths on distinct disk drives (separate LUN). Jetstress may frequently fail the automatic tuning if you decide to host many storage groups on the same disk drive. We recommend that you suppress tuning and use a static number of threads for frequent automatic tuning failures.

    • Suppress Tuning and Use Thread Count - Jetstress may frequently fail the automatic tuning if you decide to host many storage groups on the same disk drive, so now there’s an option to suppress tuning

    Configuring Jetstress Relative to Performance of a Specific Disk Subsystem

    It is important to appropriately configure Jetstress in relation to the performance of the specific disk subsystem. This table provides guidelines for the number of threads for the log disk writes per second and the database disk transfers per second.


    These threads are applied on a per storage group basis. The more storage groups you have, the more I/O you will have with a constant thread count.

    Threads

    Log Disk Writes/sec

    DB Disk Transfers/sec

    1

    33

    107

    2

    63

    195

    3

    105

    308

    4

    150

    400

    5

    190

    535

    10

    390

    1050

    20

    500

    1900

    At a certain point, adding more threads does not necessarily increase disk throughput. It may only increase the I/O latency. We recommend that you start with fewer threads and increase them over different tests as the disk subsystem shows it can handle the load. You can determine how well the disk subsystem responds by reviewing the test results.


    Analyzing Results

    After the test is completed, the performance data is analyzed and reported in a summary report. Results will be saved to Performance_(DateTime).html file. All the performance counters collected will be gathered in a counter log file named Performance_(DateTime).blg that you can use for some more advanced analysis.

    Consider the following guidelines when examining the data collected.

    Table 1: Guidelines for examining Jetstress 2007 analysis reports

    Performance Counter Instance

    Guidelines for Performance Test

    Guidelines for Stress Test

    Database Avg. Disk sec/Read

    The average value should be less than 20 ms (.20) and the maximum values should be less than 50 ms.

    The maximum value should be less than 100 ms.

    Log Avg. Disk sec/Write

    Log disk writes are sequential, so average write latencies should be less than 10 ms, with a maximum of no more than 50 ms.

    The maximum value should be no more than 100 ms.

    %Processor Time

    Average should be less than 80% and the maximum should be less than 90%.

    Same as for Performance test.

    Available Mbytes (32-bit Windows Server)

    Minimum should be no less than 50 MB.

    Same as for Performance test.

    Free System Page Table Entries (32-bit Windows Server)

    Minimum should be no less than 5000.

    Same as for Performance test.

    Transition Pages Repurposed/sec (Windows Server 2003)

    Average should be less than 100.

    Same as for Performance test.

    Pages/sec (Windows 2000 Server)

    Average should be less than 100.

    Same as for Performance test.

    Pool Nonpaged Bytes (32-bit Windows Server)

    Maximum should be less than 75 MB.

    Same as for Performance test.

    Pool Pages Byes (32-bit Windows Server)

    Maximum should be less than 180 MB.

    Same as for Performance test.

    Database Page Fault Stalls/sec.

    Maximum should be less than 1.0.

    Same as for Performance test.


    http://www.redline-software.com/eng/support/articles/msexchange/2007/disk-performance-testing-jetstress-2007.php


    martes, 12 de julio de 2011

    Archive mailbox in Exchange 2010

    Excellent link relate that how to configure archiving in exchange 2010.

    http://www.howexchangeworks.com/2009/08/archive-mailbox-in-exchange-2010.html

    Enable Pipeline Tracing

    Setting the value for the PipelineTracingSenderAddress parameter to "<>" captures all e-mail server-generated messages received by the Hub Transport or Edge Transport server that you are configuring. Depending on the amount of e-mail server-generated messages that your organization receives, this may place a significant load on the server and may quickly consume available disk space. Always monitor available disk space when pipeline tracing is enabled.

    How to:
    http://technet.microsoft.com/en-us/library/bb125018.aspx

    domingo, 10 de julio de 2011

    Role Groups and Roles + Exchange 2010

    An important concept you need to understand in order to appreciate RBAC is the relationship between role groups, roles, cmdlets (commandlets) and parameters.

    The RBAC Triangle of Power

    Before we end this article, let’s have a look at a graphical representation that summarizes how RBAC works.

    Members of the Exchange team like to depict the workings of the RBAC with what they call the "Triangle of Power".


    The Triangle of Power is made up of four main components: the Where, the What, the Who, and the Glue.

    The Where or Scope represents the range over which a particular role assignment is supposed to apply, i.e., a single organizational unit, a single user, a group of users, or the entire organization.

    The What or Role represents what your role can actually do. Exchange Server 2010 has 65 built-in roles that you can either use straightaway or build from.

    The Who or Role Group, as we mentioned way back, is simply a collection of roles (which in turn are made up of cmdlets and parameters). You combine this with the Scope to come up with a complete Role Assignment.

    Predefined Role Groups used in Exchange Server 2010 Role Based Access Control:

    1. Delegated Setup - For admins who need to deploy Exchange 2010 servers that have been previously provisioned by a member of the Organization Management role group.
    2. Discovery Management - For admins who need to perform searches of mailboxes for data that meet specific criteria as well as configure legal holds on mailboxes.
    3. Help Desk - For admins who need to view and modify the Microsoft Office Outlook Web App options.
    4. Hygiene Management - For administrators who need to configure the virus and antivirus features of Exchange.
    5. Organization Management - For admins who need to have administrative access to the entire Exchange 2010 organization.
    6. Public Folder Management - For administrators who need to manage public folders and databases on servers running Exchange 2010.
    7. Recipient Management - For admins who need to manage Exchange 2010 recipients.
    8. Records Management - For administrators who need to configure compliance features such as retention policies, message classifications, and transport rules.
    9. Server Management - For admins who need to set server-specific configurations of transport, Unified Messaging (UM), client access, and mailbox features.
    10. UM Management - For admins who need to manage UM-related server configurations, properties on mailboxes, prompts, and auto attendant configurations.
    11. View-Only Organization Management - For administrators who need to view the properties of any object in Exchange.
    http://technet.microsoft.com/en-us/library/dd298183.aspx
    http://www.msexchange.org/articles_tutorials/exchange-server-2010/management-administration/exchange-2010-role-based-access-control-part1.html


    viernes, 1 de julio de 2011

    TeamViewer

    TeamViewer connects to any PC or server around the world within a few seconds. You can remote control your partner's PC as if you were sitting right in front of it.

    Download the client for this link:

    http://www.teamviewer.com/en/download/index.aspx

    You can install this software or just run it, afther that the software provide you an ID with a security password and you are able to take remote control for other computers:


    Provide the ID and password to others persons and share your application.

    SSL Diagnostics Version 1.1 (x86)

    Download the Secure Socket Layer (SSL) troubleshooting tool for Internet Information Services (IIS).

    A common problem for administrators of IIS servers is configuring and troubleshooting SSL enabled websites. To assist in administrators efforts, Microsoft has designed a tool - SSL Diagnostics - to aid in quickly identifying configuration problems in the IIS metabase, certificates, or certificate stores.

    This tool allows users to review configuration information in a easy to read view mode or to run the tool silently with only the creation of a log file. During use, administrators can simulate the SSL handshake to find errors. They can also quickly "hot swap" certificates for testing purposes.

    Overview

    A common problem for administrators of IIS servers is configuring and troubleshooting SSL enabled websites. To assist in administrators efforts, Microsoft has designed a tool - SSL Diagnostics - to aid in quickly identifying configuration problems in the IIS metabase, certificates, or certificate stores.

    This tool allows users to review configuration information in a easy to read view mode or to run the tool silently with only the creation of a log file. During use, administrators can simulate the SSL handshake to find errors. They can also quickly "hot swap" certificates for testing purposes.

    These packages come in two forms: Express and Full. The express will only give the pertinent tools for administrators to use SSL Diagnostics while full install installs the same files with the appropriate documentation. Included in the full install is a SSL Frequently Asked Questions that can assist in the learning of SSL for administrators.


    System requirements

    Supported Operating Systems: Windows 2000, Windows NT, Windows Server 2003, Windows Server 2003 R2 (32-Bit x86), Windows Server 2003 Service Pack 1, Windows Server 2003 Service Pack 2, Windows XP Professional Edition

    This update includes fixes from customer reported issues as well as expand functionality including creation of self-sign certificates. For more information, please visit the IIS Diagnostics home page.

    http://www.microsoft.com/download/en/details.aspx?id=674

    How to??

    with this tool you can check the SSL version that you client are using:


    lunes, 13 de junio de 2011

    Nonpaged Pool Memory

    what distinguishes Paged Pool and NonPaged Pool memory? The first difference is that Paged Pool is exactly what its name implies - it can be paged out. The NonPaged Pool cannot be paged out. Drivers use the NonPaged Pool for many of their requirements because they can be accessed at any Interrupt Request Level (IRQL). The IRQL defines the hardware priority at which a processor operates at any given time (there's a link to a document covering Scheduling, Thread Context and IRQL's in the Additional Resources section at the end of this post).

    Getting back to our Pool Resources, it is important to remember that these resources are finite. The table below outlines some sample maximum values for Paged / NonPaged Pool on x86 systems that are not configured with the /3GB switch in the system's boot.ini file. We'll cover /3GB and its effects on memory in a future post. We'll also cover Kernel Changes to Windows Vista separately. It's important to note that x64 systems don't suffer from the same Virtual Address Space limitations!

    Windows 2000

    System RAM NonPaged Max Paged Max Paged Max (TS)
    512 MB 131 MB 264 MB 160 MB *
    1024 MB 212 MB 268 MB 160 MB *
    1536 MB 256 MB 340 MB 160 MB *
    2048 MB 256 MB 340 MB 160 MB *

    * If Terminal Services is installed on Windows 2000, Paged Pool is lowered down to 160 MB unless a registry change is made to the server to set the Paged Pool Size to its maximum value (see below).

    Windows 2003 SP1

    System RAM NonPaged Max Paged Max
    512 MB 125 MB 184 MB
    1024 MB 202 MB 168 MB
    1536 MB 254 MB 352 MB
    2048 MB 252 MB 352 MB

    On Windows 2003 systems, Terminal Services are enabled by default.

    On both Windows 2000 and Windows 2003, the HKLM\System\CurrentControlSet\Control\Session Management\Memory Management\PagedPoolSize value can be set to 0xFFFFFFFF (or resetting the value to 0) to ensure that the Virtual Address Space used for Paged Pool is maximized.

    Also - here's the theoretical maximums for pre-Vista Operating Systems:

    Region IA-64 x64 x86
    Process Address Space 7152 GB 8192 GB 2 to 3 GB*
    Paged Pool 128 GB 128 GB 470 to 650 MB
    NonPaged Pool 128 GB 128 GB 256 MB

    http://blogs.technet.com/b/askperf/archive/2007/03/07/memory-management-understanding-pool-resources.aspx


    For server runing Exchange 2003


    The following table displays the matrix of evaluations used by the Exchange Server Analyzer to determine whether this value is out-of-bounds for a specified Exchange server. If the conditions in the following table are matched, a warning is displayed.

    Operating System Boot.ini Setting Current Non-Paged Pool is

    Microsoft Windows 2000 Advanced Server

    /3GB

    100 MB or more

    Microsoft Windows 2000 Server or Advanced Server

    None

    200 MB or more

    Microsoft Windows Server™ 2003

    /3GB

    100 MB or more

    Microsoft Windows Server 2003

    None

    200 MB or more

    The PoolNonpagedBytes key value is the size, in bytes, of the kernel memory non-paged pool. This is an area of physical system memory for objects that cannot be written to disk even when they are not being used. This value for this key is the last observed value. On a healthy Exchange server, unless a backup or restore is occurring, there should be no more than 85 MB of non-paged pool memory being used.

    http://technet.microsoft.com/en-us/library/aa996269%28EXCHG.80%29.aspx


    Schedule free bussy

    Outlook 2003 and 2007

    Outlook 2007 will look for a Client Access Server to view free/busy info. Exchange 2003 uses public folders to publish free/busy info.

    To force Outlook 2007 to look for Public Folder based Free/Busy information you need to hack the registry:

    HKEY_CURRENT_USER\Software\Microsoft\Office\12.0\Outlook\Options\Calendar
    Value Type:
    DWORD
    Value Name:
    UseLegacyFB
    Values:
    0 or not set (default behavior which is to use the Availability Service) or 1 (use Public Folder based Free/Busy information)

    Special Considerations for Working with Client Permissions

    For outlook 2003

    MS recomendation:

    By default:

    For outlook 2007:

    · Si ambos usuarios no están, usen PFadmin para reparar los permisos, al agregar o modificar permisos, también corrige problemas.

    ------------------------------------------------------------------------------------------------------------------------------------------------------

    Algunos testeos q están buenos:

    Test configuration on outlook 2007

    # While Outlook 2007 is running, hold down the CTRL key, right-click the Outlook icon in the notification area, and then select Test E-mail AutoConfiguration.

    # Verify that the correct e-mail address is in the box next to E-mail Address.

    # Clear the check boxes next to Use Guessmart and Secure Guessmart Authentication.

    # On the Test E-mail AutoConfiguration page, verify that the check box next to Use AutoDiscover is selected, and then click the Test button.


    Enable TST

    # In Outlook 2007, on the Tools menu, click Options, click the Other tab, and then click Advanced Options.

    # On the Advanced Options page, select Enable logging (troubleshooting), and then click OK.

    # Restart Outlook 2007, and then try to view free/busy information for another user.

    # In Microsoft Windows, click Start, click Run, and then type %temp%.

    # In Windows Explorer, open the olkdisc.log file and locate the files in the olkas directory.

    miércoles, 11 de mayo de 2011

    SSL services in exchange 2007

    On exchange 2007 there are many client protocols as 2003 as well, when import a cert on the CAS or HUB server, we are able to co consolidate or associate those with all services (pop3, imap4,smtp,owa).

    For a clients outlook express and SMTP we must take care with the configuration, by default there is a receive connector for a clients:


    On the client:


    We are using an internal PKI and in order to request a new SMTP certificate using the Exchange Management Shell use the following cmdlet:

    New-ExchangeCertificate –GenerateRequest –Path c:\cert.req –SubjectName “cn=relay.apatricio.local” –FriendlyName “Internal Relay Certificate” –PrivateKeyExportable:$True

    Now, let’s request the certificate created using the Certification Authority webpage:

    1. Logged on Exchange Server open the http:///certsrv, where is your server which hosts the Certification Authority.
    2. Click on Request a Certificate link.
    3. Click on advanced certificate request.
    4. Click on the second link which is Submit a certificate request by using a base-64-encoded CMC or PKCS #10 file, or submit a renewal request by using a base-64-encoded PKCS #7 file.
    5. Open the file C:\cert.req which was created by New-ExchangeCertificate cmdlet and copy the content.
    6. Paste the content of that file into the Base-64-encoded certificate request field in the webpage.
    7. On the same page, select Web Server in the Certificate Template field and then click the Submit button.
    8. On the new page, click on the Download Certificate link and save it in the C:\ root of the Exchange Server.

    Let’s import the new certificate, to do that use this cmdlet:

    Import-ExchangeCertificate –Path:C:\certnew.cer

    Note:
    The file name and path is just an example, you have to use the file name and path that you have used in the previous step.

    Time to enable the new imported certificate to be used by the SMTP service using the Exchange Management Shell. To enable it we just need to copy the Thumbprint that was shown when we imported the request in the previous step and use this cmdlet:

    Enable-ExchangeCertificate –Thumbprint -Services SMTP

    You will be prompted to change the default SMTP certificate, just type in N and hit enter.

    Use get-excgangecertificates | fl PS to see the current services attached on the cert:

    More information:

    http://technet.microsoft.com/en-us/library/aa997231%28EXCHG.80%29.aspx

    For enable logging:


    martes, 10 de mayo de 2011

    Information Store and Log sequence numbers

    Event 514 on our exchange server means that the logs sequence is consume and when is completed, all Exchange databases will dismounted.

    Information Store (6768) XXX: Log sequence numbers for this instance have almost been completely consumed. The current log generation is 933000 (0x000E3C88) which is approaching the maximum log generation of 1048559 (0x000FFFEF), there are 115559 (0x0001C367) log generations.

    So the maximum log generation is 1048559 (0x000FFFEF) and remains 115559 logs to consume, so ig we find on the APP eventvwr the event number 214, we can estimate how many logs our Exchange use by day and we can estimate how many days we have until to have this problem.

    Exchange 2007 supports 2 billion log files (2147483628) which is 7fffffec in hexadecimal.

    Notice that if you miss the ESE 514 warning your databases will dismount and generate the following events:

    Event ID: 1159
    Event Type: Error
    Event Source: MSExchangeIS
    Event Category: General
    Description: Database error 0xfffffdf9 occurred in function JTAB_BASE::EcEscrowUpdate while accessing the database "First Storage Group\Mailbox Store (SERVER)".

    Event ID: 9518
    Event Type: Error
    Event Source: MSExchangeIS
    Event Category: General
    Description: Error 0xfffffddc starting Storage Group Path_of_Storage_Group on the Microsoft Exchange Information Store. Storage Group - Initialization of Jet failed.

    More info.
    http://support.microsoft.com/kb/830408

    Solution:

    One of the common solution is dismount all database that are part of storage group, move out all logs and CHK file, mount all databases, CHK file and transaction logs will create starting in 0.

    1--


    2--


    3--


    4--


    After that, all incremental backup are unusable, so run a full backup after this procedure.