miércoles, 24 de marzo de 2010


Internet explorer 9?

Check out the new capabilities of the next Internet Explorer, with the Internet Explorer 9 Platform Preview. Find demos of HTML5 and the hardware-accelerated performance with background compiled JavaScript. You can also download the Windows Internet Explorer Platform Preview user guide and release notes.
Un Poco de Power Shell
Seteos de Exchange quota con PShell
Ver conf. actual:
get-mailbox -identityfl *quota*
Set-Mailbox-UseDatabaseQuotaDefaults:$False -issuewarningQuota 90MB -ProhibitSendQuota 100MB -ProhibitSendReceive “UNLIMITED”

Medianre una variable:
$a = get-mailbox -identitu
Set-Mailbox $a -UseDatabaseQuotaDefaults:$False -issuewarningQuota 90MB -ProhibitSendQuota 100MB -ProhibitSendReceive “UNLIMITED”
Para Multiples usuarios desde un txt
get-content “C:\names.txt” Set-Mailbox -UseDatabaseQuotaDefaults:$False -issuewarningQuota 90MB -ProhibitSendQuota 100MB -ProhibitSendReceive “UNLIMITED”

get-content “C:\names.txt” Set-Mailbox -UseDatabaseQuotaDefaults:$False -issuewarningQuota “UNLIMITED” -ProhibitSendQuota “UNLIMITED” -ProhibitSendReceive “UNLIMITED”
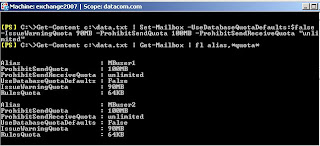
Ver conf. actual:
get-mailbox -identity
Set-Mailbox

Medianre una variable:
$a = get-mailbox -identitu
Set-Mailbox $a -UseDatabaseQuotaDefaults:$False -issuewarningQuota 90MB -ProhibitSendQuota 100MB -ProhibitSendReceive “UNLIMITED”
Para Multiples usuarios desde un txt
get-content “C:\names.txt” Set-Mailbox -UseDatabaseQuotaDefaults:$False -issuewarningQuota 90MB -ProhibitSendQuota 100MB -ProhibitSendReceive “UNLIMITED”

get-content “C:\names.txt” Set-Mailbox -UseDatabaseQuotaDefaults:$False -issuewarningQuota “UNLIMITED” -ProhibitSendQuota “UNLIMITED” -ProhibitSendReceive “UNLIMITED”

martes, 16 de marzo de 2010
HUB server en exchange 2007
The Hub Transport Server role is responsible for routing messaging, not only between the Internet and the Exchange organization, but also between Exchange servers within your organization.
All messages are always routed via the Hub Transport Server role, even if the source and the destination mailbox are on the same server, and even if the source and the destination mailbox are in the same Mailbox Database. For example, in Figure 8, the Hub Transport Server is responsible for routing all messages:
Step 1: A message is sent to the Hub Transport Server.
Step 2: A recipient on the same server as the sender means the message is sent back.
Step 3: When the recipient is on another mailbox server, the message is routed to the appropriate Hub Transport Server. This is then followed
Step 4: The second Hub Transport Server delivers the message to the Mailbox Server of the recipient.

lunes, 28 de diciembre de 2009
Metricas
En una organización mediana/grande es importante tomar métricas como información historial, ante un eventual problema podemos consultar esta información y descubrir alguna configuración q ya no este o incluso hacer un rolback de algún objeto en AD.
Exportar la información desde ad es muy fácil con alguna sentencia “ldiff o CSVDE” con estos comando podemos hacer una exportación parcial o total de acuerno a lo que sea necesario:
Command: CSVDE -d "OU=Newport,DC=cp,dc=com" -f Newport.csv
Este comando generara un file Nweport.csv con toda la infoamcion de todos los objetos dentro de la OU Newport.
Introduction to CSVDE Switches With an Active Directory import or export
The spreadsheet should be your focus. Surprisingly, CSVDE and its switches only play a minor part in the data exchange. My point is that with other Windows executables like Isinteg or NTDSUTIL you cannot learn enough about their switches. However, you can become an expert in CSVDE with just a passing acquaintance with these 6 switches: -d, -f, -i, -k, -l, and -r. As I keep saying, the real work is done in the Excel spreadsheet, especially with an import into Active Directory.
Arma tu sentencia de acuerdo a lo q necesiten :
http://www.computerperformance.co.uk/Logon/Logon_CSVDE_switches.htm
Para mailboxes: Este link es el de scripts del Ms Repository, pueden encontrar varios scripts para sacar reportes de acuerdo a la versión de
Exchange y adecuándose a lo q necesiten.
http://gallery.technet.microsoft.com/ScriptCenter/en-us/site/search?f%5B0%5D.Type=RootCategory&f%5B0%5D.Value=messaging&f%5B0%5D.Text=Messaging%20%26%20Communication&f%5B1%5D.Type=SubCategory&f%5B1%5D.Value=exchange2003&f%5B1%5D.Text=Microsoft%20Exchange%202003http://gallery.technet.microsoft.com/ScriptCenter/en-us/d910243b-30c1-4832-a6dd-5f2c1da528c6
Exportar la información desde ad es muy fácil con alguna sentencia “ldiff o CSVDE” con estos comando podemos hacer una exportación parcial o total de acuerno a lo que sea necesario:
Command: CSVDE -d "OU=Newport,DC=cp,dc=com" -f Newport.csv
Este comando generara un file Nweport.csv con toda la infoamcion de todos los objetos dentro de la OU Newport.
Introduction to CSVDE Switches With an Active Directory import or export
The spreadsheet should be your focus. Surprisingly, CSVDE and its switches only play a minor part in the data exchange. My point is that with other Windows executables like Isinteg or NTDSUTIL you cannot learn enough about their switches. However, you can become an expert in CSVDE with just a passing acquaintance with these 6 switches: -d, -f, -i, -k, -l, and -r. As I keep saying, the real work is done in the Excel spreadsheet, especially with an import into Active Directory.
Arma tu sentencia de acuerdo a lo q necesiten :
http://www.computerperformance.co.uk/Logon/Logon_CSVDE_switches.htm
Para mailboxes: Este link es el de scripts del Ms Repository, pueden encontrar varios scripts para sacar reportes de acuerdo a la versión de
Exchange y adecuándose a lo q necesiten.
http://gallery.technet.microsoft.com/ScriptCenter/en-us/site/search?f%5B0%5D.Type=RootCategory&f%5B0%5D.Value=messaging&f%5B0%5D.Text=Messaging%20%26%20Communication&f%5B1%5D.Type=SubCategory&f%5B1%5D.Value=exchange2003&f%5B1%5D.Text=Microsoft%20Exchange%202003http://gallery.technet.microsoft.com/ScriptCenter/en-us/d910243b-30c1-4832-a6dd-5f2c1da528c6
miércoles, 23 de diciembre de 2009
Exchange 2010
FREE! "Exchange 2010 - A Practical Approach"
Free copy of the "Exchange 2010 - A Practical Approach" eBook by Exchange MVP Jaap Wesselius
Thanks Jaap!!!!!!

http://www.red-gate.com/specials/Exchange/esa_exchange2010.htm?utm_source=msexchange&utm_medium=email&utm_term=1061&utm_content=jaapebook&utm_campaign=esa
Free copy of the "Exchange 2010 - A Practical Approach" eBook by Exchange MVP Jaap Wesselius
Thanks Jaap!!!!!!

http://www.red-gate.com/specials/Exchange/esa_exchange2010.htm?utm_source=msexchange&utm_medium=email&utm_term=1061&utm_content=jaapebook&utm_campaign=esa
viernes, 20 de noviembre de 2009
Cluster en virtual Server 2005 R2
- Todos los q estamos en esto hace tiempo sabemos q probar una nueva implementación en un ambiente de testing nos ahorra mucho dolor de cabeza.
- Con este software q lo podemos descargar gratuitamente de la pagina de M$ tenemos la opción de instalar Windows en cluster y pobrar todas la aplicaciones disponibles solo para x86, para x64 esta disponible Microsoft® Hyper-V™ Server 2008 R2, pero hay requisitos de hard y soft base:
- Requisitos del sistema
Sistemas operativos compatibles: Hyper-V Server 2008 : - A list of supported guest operating systems can be found here
Processor : x64 compatible processor with Intel VT or AMD-V technology enabled. Hardware Data Execution Prevention (DEP), specifically Intel XD bit (execute disable bit) or AMD NX bit (no execute bit), must be available and enabled. - Minimum CPU speed : 1.4 GHz; Recommended: 2 GHz or faster
RAM : Minimum: 1 GB RAM; Recommended: 2 GB RAM or greater (additional RAM is required for each running guest operating system); Maximum 1 TB - Available disk space : Minimum: 8 GB; Recommended: 20 GB or greater (additional disk space needed for each guest operating system)
- DVD ROM drive
- Display : Super VGA (800 × 600) or higher resolution monitor
- Other : Keyboard and Microsoft Mouse or compatible pointing device Note: The actual system requirements will vary based on your system configuration and hosted guest operating systems.
Para virtual server los requisitos son menores, vasta con tener xp, un buen hardware y mínimo 2GB de memoria ram.
Para descargar virtual Server 2005 R2:
http://technet.microsoft.com/es-ar/bb738033.aspx
Para descargar Microsoft® Hyper-V™ Server 2008 R2
http://technet.microsoft.com/es-ar/evalcenter/dd776191.aspx
Como armamos nuestro cluster:
Fácil, tenemos q instalar dos virtual con algún SO Enterprise, lo hicimos con win2003sp2:
Para el cluster vamos a crear un disco Q (quorum) de 500 como
En ambos nodos configuraremos un adaptador SCSI y lo configuraremos para cluster:
Cuando habilitemos este placa para ambos nodos, en la configuración de discos para cada maquina se desplegara un bus scsi adicional a los IDE donde están conectados los discos del SO. Esto lo vemos editando cada uno de los nodos virtuales:
Relacionamos el SCSI share bus con el disco q creamos anteriormente (en ambos nodos), en la imagen se muestra dos SCSI por q en mi virtual agregue 2 SCSI adapters:
Asi quedo:
En este link tiene la configuración de las redes para el cluster y instalación de la aplicación, para la configuración de discos sigan la q esta arriba.
http://www.microsoft.com/technet/prodtechnol/virtualserver/deploy/cvs2005.mspx
Espero q les sea de ayuda :)


Suscribirse a:
Entradas (Atom)


